November 30, 2014

Using Firebase from a Dart client and server

In my previous post I described how I created the ChessChallenge game using Polymer and Dart. Now I will make the game a bit more interesting by storing the ten best results in a list. To persist the list I chose Firebase, which is a simple but powerful way of storing and syncing data in realtime.
Another option would have been to use MongoDB on the server, which is included at DartVoid.

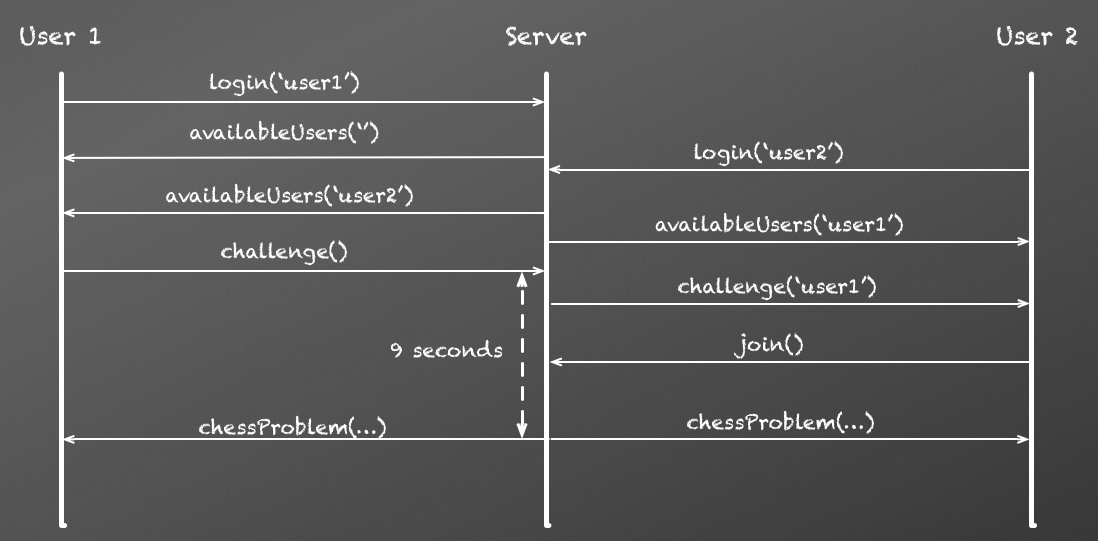
Below is a picture of the communication that takes place between the Client, Server and Firebase.


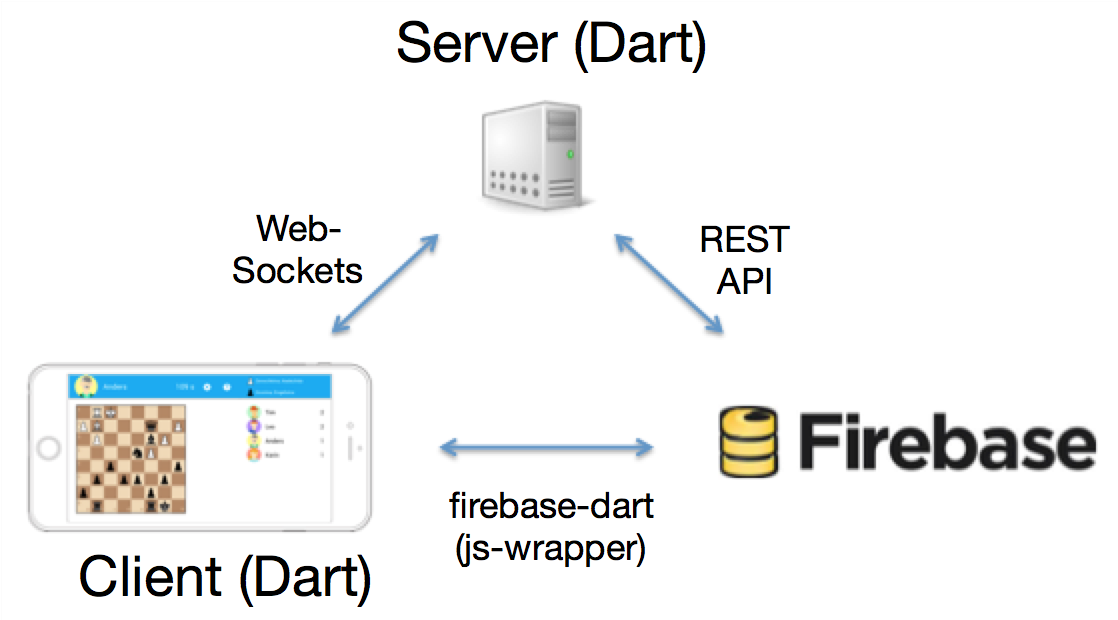
For the Client I used the Dart library firebase-dart, which wraps the standard JavaScript API. The Client listens for changes to the top list in Firebase and deserializes the data into a list of Users. You can also use onChildAdded if you want to receive events for the individual elements in the list.

  var fb = new Firebase('${firebaseUrl}/toplist');
  fb.onValue.listen((event) {
    List users = event.snapshot.val();
    if (users != null) topList =
        users.map((u) => new User.fromMap(u)).toList();
  });

For the server side the easiest way to read and write data is using the Firebase REST API. The whole top list will be written using a PUT request, see below. You can also use POST if you want to add single elements to a list.

  new HttpClient().putUrl(
      Uri.parse(
          '${firebaseUrl}/toplist.json')).then((HttpClientRequest request) {
    request.headers.contentType = ContentType.JSON;
    request.write(JSON.encode(topList));
    return request.close();
  }).then((HttpClientResponse response) {
    response.transform(UTF8.decoder).listen((contents) {
      print('Stored new top list in Firebase: ${contents}');
    });
  });

Dart does not give you automatic serialization support for classes, so you need to add it yourself.
Below is the code for the User class. There are several ways you can do this without having to write this code manually, for example using annotations and library support.

class User {
  String name;
  int avatar;
  int score = 0;
  int time;

  User(this.name, this.avatar);

  User.fromMap(Map map) {
    name = map['name'];
    avatar = map['avatar'];
    score = map['score'];
    time = map['time'];
  }

  Map toJson() {
    return {
      'name': name,
      'avatar': avatar,
      'score': score,
      'time': time
    };
  }
}

I was amazed how easy it was to use Firebase for adding the top 10 list feature. Firebase also has good support for authentication and security, but I will look into that another time.

The code is available on GitHub.

November 23, 2014

Creating a multiplayer game using Dart, Polymer and WebSockets

In my previous post I described how I created a Polymer element for a chessboard and a simple app to test it.

Here, I will give a brief overview how I took this further and created a multiplayer game ChessChallenge as a more fun way of solving chess problems. The game idea is to challenge other players in being first to solve five chess problems. Below is a screenshot of the game. On the right hand you see the list of players in the competition and how many problems they have solved. The chessboard shows the current problem and you solve it by making the check-mate move.


Instead of having to manually enter the chess problems I found libraries of free PGN games from real chess tournaments on the web. To display a "mate-in-one problem" I just needed to find all games that ended with checkmate and then undo the last move. My chessboard element can load a PGN game and can undo moves so everything needed was already supported. The chess games also contained the name and ranking of the real players (displayed at the top-right in the game).

First I implemented a simple login page with the nice looking avatars taken from the Topeka Quiz App. Topeka is written in JS but it was an easy task to convert the login page into Dart. Because the UI is declaratively defined using HTML the difference is only in the logic behind the page.

Then I sketched how the communication between two clients and the server would look like when starting a challenge. The server would be responsible for keeping track of players, the on-going challenges and serve chess problems and scores in real-time.


Dart works great on the server side and has support for WebSockets so I decided to implement both the client and server in one Dart project. The game data used by the client and server can thus be shared, and the Dart Editor has great support for debugging both client and server code.

I looked at some alternatives for hosting the game and found that DartVoid had just what I needed. With great support from the DartVoid team the application was up in no time with only one extra configuration file needed in my project. With their GitHub integration it was also easy to setup and deploy the project.

This project has been a fun way of learning how to write an application using modern web techniques, and my conclusions are:

  • Using web components is a great way to build applications from reusable building blocks. 
  • Polymer makes it really simple to use web components and to set up two-way data binding between the declarative UI and the underlying logic.
  • Using the Polymer Paper elements makes it easy to design professional looking apps that works well both on mobile and desktop.
  • Dart is a really powerful language with great support for writing both client- and server-side code.

The code for ChessChallenge is available on GitHub.

November 9, 2014

Creating a chessboard element using Dart and Polymer

This will be the first part of two describing how I built a simple multi-player chess game using Dart and Polymer. It all started out during my summer vacation when going through a book of chess problems with my kids.

Although good, the book only consists of lots of these "mate-in-one" puzzles. There must be a more fun way of teaching this, like a mobile game on their iPads.

At the same time at Google I/O, the nice Material Design was announced and it was available for Dart and the Polymer framework. Finally, a great UI widget library! And Polymer is the kind of framework that I have been longing for. To be able to put together applications from existing components is the kind of reuse that makes me tick.
A quick stop at the Dart pub, and chess.dart (port of chess.js) was found. Yay! That functionality for keeping the game state, loading games from standard chess notation, ... and more, would sure come in handy.

For displaying the chessboard in the game I needed something like chessboard.js, but that wasn’t available in the pub. My first plan was to wrap the JS library, but I soon realise it would be nicer to write a cleaner version using these emerging web technologies. A chessboard tag would be great to have.

Without going into the details of my implementation chessboard.dart, here are some key benefits I found using these newer technologies:
  • Separation of presentation from logic. I was able to move most of the presentation logic from code into HTML. In the JS version the HTML is generated in JS.
  • CSS encapsulation inside the web component relieved me from having to generate unique element ids as in the JS version.
  • Clear separation between modules. There is an overlap of functionality in chess.js and chessboard.js that I could nicely clean up in the Dart implementation.
  • The chessboard.dart implementation contains roughly around 350 lines of Dart code compare to around 1200 lines of JavaScript in chessboard.js (excluding the animation support, which I didn’t need).
To demonstrate how to use the chessboard element in a Polymer application I created a simple Chessboard App. Using the Polymer core- and paper-elements, I got a mobile-friendly app in less than 100 lines of Dart code and a nice declarative HTML.


Here is an extract of how it looks like to insert the chessboard element and to data bind to some of its properties:

          <chess-board id="chess_board" on-move="{{onMove}}"></chess-board>
          <core-item id="turn" label="{{$['chess_board'].turn}} to move"></core-item>
          <core-item id="gameStatus" label="{{$['chess_board'].gameStatus}}"></core-item>

          void onMove(CustomEvent event, detail, target) {
            ChessBoard chessBoard = target;
            print('Move event, next turn is ${chessBoard.turn}');
          }

In the next part, I will show you how I continued to build upon the chessboard element to create a multiplayer “Chess challenge” game.